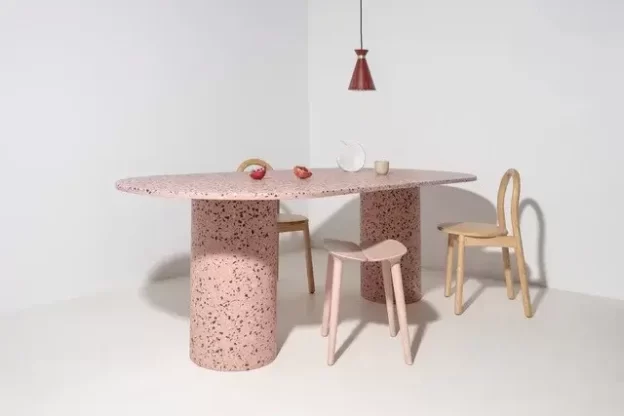
The Ultimate Guide to Creating a Terrazzo Look on GFRC for Beginners
Discover how to create a stunning terrazzo look on GFRC with our comprehensive, beginner-friendly step-by-step guide. We’ll walk you through the entire process, including grinding, polishing, and finishing, while sharing valuable tips and tricks along the way. By the end, you’ll have the knowledge and confidence to undertake a terrazzo job with exceptional results.
Step 1: Gather Materials and Tools To get started, you’ll need the following materials and tools:
- GFRC (Glass Fibre Reinforced Concrete) piece
- Metal bond diamond grinding tools (30-grit, 50-grit, and 100-grit)
- Resin bond diamond polishing pads (200-grit to 3000-grit)
- Variable speed grinder/polisher
- Chemical densifier (e.g., lithium silicate)
- Wet/dry vacuum
- Protective gear (gloves, goggles, and dust mask)
Tip: Investing in high-quality tools and materials will yield better results and increase the longevity of your equipment.
Step 2: Understand the Grinding Process The grinding process involves using metal bond diamond tools to smooth and level the surface of the GFRC piece. Start with a coarse grit (30 or 50) and progress to finer grits (100 or higher) to achieve the desired smoothness. The grinding process will remove the top layer of the GFRC to expose the decorative aggregates, creating the terrazzo look.
Hint: The coarser the grit, the more aggressive the grinding and the more material will be removed.
Step 3: Choose the Right Metal Bond Diamond Tools Selecting the appropriate metal bond diamond tools is crucial for efficient grinding. Factors to consider include the hardness of the GFRC and the size of the aggregates. For harder GFRC or larger aggregates, a lower grit (e.g., 30-grit) may be necessary. Conversely, for softer GFRC or smaller aggregates, a higher grit (e.g., 50 or 100-grit) may suffice.
Tip: Performing a test grind on a small, inconspicuous area can help you determine the optimal starting grit.
Step 4: Grinding the GFRC Surface With the appropriate metal bond diamond tools selected, follow these steps to grind the GFRC surface:
- Attach the coarsest diamond grinding tool to the variable speed grinder/polisher.
- Set the grinder’s speed to a low RPM (around 500-700 RPM) for aggressive material removal.
- Wet the GFRC surface to minimize dust and prolong tool life.
- Begin grinding in a consistent pattern, overlapping each pass to maintain an even surface.
- Use a wet/dry vacuum to clean the surface after each grit change.
- Repeat steps a to e with progressively finer grits until the desired smoothness is achieved.
Hint: Observe scratch patterns to ensure even grinding. Uneven patterns may require additional passes with the same grit tool.
Step 5: Applying the Densifier A chemical densifier, such as lithium silicate, strengthens the GFRC surface and enhances the polishing process. After grinding, apply the densifier according to the manufacturer’s instructions. Allow it to penetrate and cure before proceeding to the polishing stage.
Tip: Use a densifier specifically formulated for GFRC to ensure optimal results.
Step 6: Polishing with Resin Bond Diamond Pads To achieve a high-gloss finish, use resin bond diamond polishing pads in a progressive manner, starting with a 200-grit pad and working up to a 3000-grit pad.
Follow these steps:
- Attach the 200-grit polishing pad to the variable speed grinder/polisher.
- Increase the grinder’s speed to a medium RPM (around 800-1200 RPM) for effective polishing.
- Wet the GFRC surface to minimize dust and prolong pad life.
- Begin polishing in a consistent pattern, overlapping each pass to maintain an even surface.
- Use a wet/dry vacuum to clean the surface after each grit change.
- Repeat steps a to e with progressively finer grit pads until the desired gloss level is achieved.
Hint: Keep an eye on the clarity and reflection of the surface as you progress through the grits. The higher the grit, the better the shine.
Step 7: Inspecting the Surface After each polishing stage, inspect the surface for any remaining scratches, pinholes, or other imperfections. Address these issues before moving on to the next grit level.
Tip: Using a light source at a low angle can help reveal imperfections that might not be visible under normal lighting conditions.
Step 8: Sealing and Protecting the GFRC Surface To protect your newly polished GFRC terrazzo piece from stains, scratches, and spills, apply a protective sealer or guard product according to the manufacturer’s instructions. Ensure the surface is clean and dry before application and allow the sealer to fully cure before using the surface.
Hint: A high-quality sealer can also enhance the colour and appearance of the terrazzo, providing additional depth and richness to the final result.
Following this comprehensive step-by-step guide, you’ll be well-equipped to create a beautiful terrazzo look on GFRC surfaces. With the right tools, materials, and techniques, even beginners can achieve professional-quality results. Take your time, practice, and experiment with different grit levels and polishing techniques to find the perfect combination for your specific project. Happy grinding and polishing!